Have you ever wondered how simple electric motors work? With just a few materials, you can build a homopolar motor and explore how electrical energy turns into spinning motion! Grab a neodymium disc magnet, some copper wire, and a battery, and let’s get started!

What Is a Homopolar Motor?
A homopolar motor is a simple electric motor that only needs a few basic parts. Invented by Michael Faraday, this device demonstrates the basics of electromagnetic force. As the electrical current passes through the conductor (the copper wire), it interacts with the magnet, producing a force that causes the wire to spin.
💡 This type of DC motor is called “homopolar” because the magnetic poles stay the same throughout the experiment. It’s a fantastic STEM activity for kids!
Grade Level: This project is suitable for students in grades 4 and older, and can be adapted for younger students with supervision.
Watch the Video:
Supplies:
- 1 AA battery (length of the battery doesn’t matter)
- 1 neodymium disc magnet (or any rare-earth magnet)
- 16 gauge Copper wire (about 5-6 inches, a good piece of wire)
- Needle-nose pliers (to shape the wire)
- Wire Cutters (cut the wire)
- A flat surface to work on
- Optional: marker to help guide the shape of the wire
How to Make a Homopolar Motor
Step 1: Shape the Wire
- Use the needle-nose pliers to bend the copper wire into a loop or other fun shape, such as a heart or spiral.
- Ensure the bottom of the wire has two ends that can touch the magnet when placed over the battery. This part is key to completing the circuit.

Step 2: Attach the Magnet
- Place the neodymium disc magnet on a flat surface.
- Attach the negative end (or bottom of the battery) to the magnet. The magnet should stick securely to the battery.
Align Properly: Make sure the magnet is centered under the battery to provide a stable base for the motor. This stability is crucial for the wire to spin effectively when the circuit is completed.

Step 3: Assemble the Motor
- Hold the battery upright with the magnet at the bottom.
- Carefully place the copper wire over the positive terminal of the battery (the positive end of the battery) so the wire balances on top and its ends touch the side of the magnet.

Step 4: Watch the Magic Happen!
- When the current travels from the battery through the wire and into the magnet, the wire will start spinning!

The Science Behind a Homopolar Motor
When you place the copper wire so that it touches both the top of the battery and the magnet at the bottom, electricity starts to flow. The battery pushes electric current (the flow of tiny electric charges) through the wire.
The magnet creates an invisible magnetic field around it. This magnetic field interacts with the electric current that is moving through the wire.
When electric current flows through the wire inside a magnetic field, a special force called the Lorentz force is created. This force pushes the wire, making it spin around the magnet.
The wire spins in a circle because the force keeps pushing it in the same direction as long as the current flows. The motor will keep spinning as long as the wire stays connected to the battery and the magnet.
Why Does It Spin?
The spinning happens because the magnetic field and the electric current work together to push the wire in a circular motion. It’s like if you push a toy car in the same direction over and over—it keeps moving forward. In the homopolar motor, the force keeps pushing in a way that makes the wire go in circles.
The main idea is that when you have electricity flowing through a wire with a magnet nearby, it can make things move. It shows how a simple electric circuit can create movement. You can see how invisible magnetic forces can have a real effect, making the wire spin around.
Variables to Explore:
💡Learn more about variables and the scientific method here!
- Shape of the Wire: Does a heart shape spin differently from a spiral?
- Number of Magnets: Does stacking magnets make the motor spin faster?
- Type of Battery: Try different sizes or types of batteries (e.g., AA vs. AAA).
How to Make It a Great Science Fair Project
Turn your homopolar motor into an impressive science fair project by exploring these ideas:
- Ask a Question: Investigate a key question, such as How does the shape of the wire affect the motor’s spinning speed?
- Experiment with Variables: Test different variables like wire length, battery type, or the number of magnets. Record your results to compare.
- Explain the Science: Include a clear explanation of electromagnetic force, DC current, and how Michael Faraday’s discovery relates to your project.
- Build a Display: Use visuals like labeled diagrams, a video demonstration, or a step-by-step photo guide of your process.
- Incorporate Extensions: Show how this simple motor relates to real-world applications, like electric cars or wind turbines.
- Add Data and Graphs: Collect measurable data, such as the speed of the motor in rotations per minute (RPM), and present it in a graph or chart.
Related Science Activities:
- Electromagnets: Use a nail, a wire, and a battery to create a powerful magnet.
- DC Motors in Action: Take apart a toy car to find the small motor inside and see how it works.
- Magnet Activities: Explore magnetism through a variety of STEAM projects.
- Magnetic Slime: Use a rare earth magnet to test this powerful slime and watch the magic.
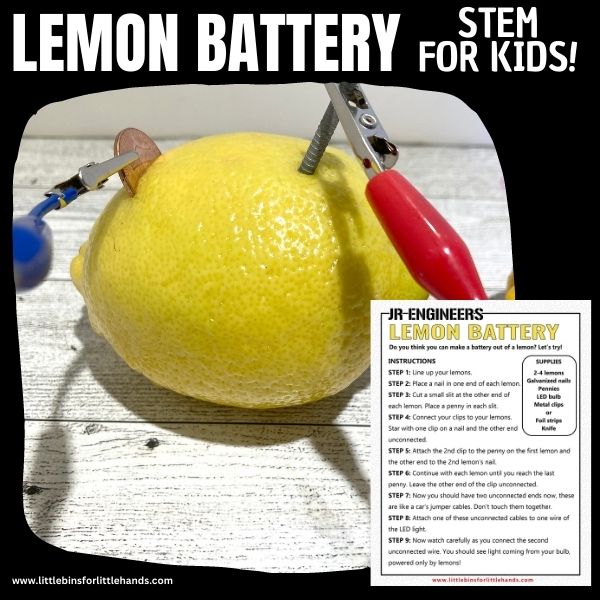
- Lemon Battery: Explore how a simple electrical circuit can light up a bulb.


Helpful Science Resources
Here are a few resources that will help you introduce science more effectively to your kids or students and feel confident presenting materials. You’ll find helpful free printables throughout.
- Printable Science Project Pack 👇
- Best Science Practices (as it relates to the scientific method)
- Science Vocabulary
- All About Scientists
- Free Science Worksheets
- DIY Science Kits
- Science Tools for Kids
- Scientific Method for Kids
- Citizen Science Guide
- Join us in the Club